Installing a Third Party SSL Certificate with Check Point Firewall
![]()

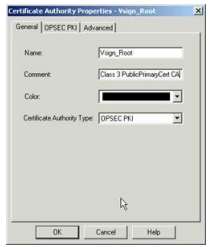
2. From the Servers and OPSEC Applications tab > Servers > Trusted CAs, select New CA > Trusted to add the top level root CA first.

3. Add the appropriate label in the Name field and select OPSEC PKI as the Certificate Authority type.
4. Select the OPSEC PKI tab. In the "Retrieve CRL From" section, make sure that only "HTTP Server(s)" is selected, and then inside the "Certificate" section, click Get to insert the root CA certificate.


6. Click Open. A view of the imported certificate appears

7. Verify the serial number or thumbprint and click OK to Accept the CA certificate
8.The Root CA object appears as shown.

Installing an Intermediate CA
Notes:
· If you are using a third party like Verisign that uses an Intermediate CA, then you must install that Intermediate CA as described in this section. If not, continue to the Obtaining a Certificate from a Third Party Certificate Authority section. Verisign has 16 different Intermediate CA certificates that are available, see: https://knowledge.verisign.com/support/ssl-certificates-support/index?page=content&id=AR657&actp=LIST
· It is always recommended to talk with your third party CA to ensure that you have the correct CA.
1. Create an Intermediate CA object. From the Servers and OPSEC applications tab > Servers > Trusted CAs > New CA, select Trusted.

2. Add the appropriate label for the Intermediate CA in the Name field

3. Select the OPSEC PKI tab and click Get to obtain the Intermediate CA certificate

4. Browse to where you have saved the Intermediate root certificate, same as before. Select the Policy Certificate only, not a chain.

5. Click Open. A view of the imported certificate appears.

6. Click OK to save the CA object. You should now see Root CA and Intermediate CA objects.


